Installing Git and GitLab on a Linux Server

Installing Git and GitLab on a Linux Server

As I said in my previous post, I am building a development environment. The starting point with any development environment is source control. I am going to use Git with GitLab as a UI over it. I’ll be installing it on a Ubuntu server.

First Steps: The Git basic setup

First, get your hands on a Linux server. Once you have it, log in as an unprivileged user and set up Git (taken from here and here), using the following commands:

Update system and install git:
sudo apt update (update apt cache)
sudo apt upgrade (upgrade to latest packages)
sudo apt install git (likely already installed)
sudo reboot (for good measure)

Now we set up the git user for the server
which git-shell (this will tell you the path to the Git shell)
sudo vi /etc/shells

add /usr/bin/git-shell (or the output of the which command) to it.

Now add a user for git to run as:
sudo adduser --disabled-password git
when prompted, leave fields blank

Next we set up the Git user – this user is used to commit files and will not have a shell or password, and will use authorized keys to send work to the server. We won’t be using it, however, since we’ll use GitLab, which communicates over http.

sudo su git
cd
mkdir ~/.ssh && chmod 700 ~/.ssh
touch ~/.ssh/authorized_keys && chmod 600 ~/.ssh/authorized_keys
vi ~/.ssh/authorized_keys

Copy your public key into the authorized_keys file. Again, not needed for GitLab, but needed to use git directly, as I mentioned above.
Then exit the git user’s shell and lock them out by setting their shell to the git shell. Since this user has neither a password not a shell, they can’t log in directly, even with a key.

exit
sudo chsh git -s $(which git-shell) 

Once that is done, you can test whether git works:

cd /home/git
sudo mkdir test_app_1.git
cd test_app_1.git/
sudo chown -R git.git test_app_1.git/
sudo git init --bare && cd ..

This should output a successful git setup.

GitLab setup

Next, we will install GitLab (instructions copied from here)

Firs, install dependencies:

sudo apt install ca-certificates curl openssh-server postfix

(for the postfix setup – I think internet site is what you want (it will want to send messages out), which we may set up later. For now, we won’t be setting up email integration, so any choice is fine.

Now, navigate to the temp folder, install the repository for GitLab, and then install GitLab itself:

cd /tmp
sudo curl -LO https://packages.gitlab.com/install/repositories/gitlab/gitlab-ce/script.deb.sh
sudo bash /tmp/script.deb.sh
sudo apt install gitlab-ce

Then configure GitLab by editing its config file and setting the URL – that’s all you need.

sudo vi /etc/gitlab/gitlab.rb

Set external_url to the external DNS name you set up for your host with your hosting provider. You’ll want to use the hosts file editor to set the internal IP address mappings on servers on your dev network that need to access it. So, if your Git/GitLab server is internally 10.0.0.8, you will need a hosts entry that contains something like:

10.0.0.8 gitserver.eastus.cloudapp.azure.com

I didn’t use https since it’s not worth the trouble in this situation, since LetsEncrypt requires certain gymnastics to get to work, and since this system will not be on all the time, it won’t be able to get new certificates.

Once you have set the external_url, run:

sudo gitlab-ctl reconfigure

Now, you can chill for a while while it sets up GitLab.

After it was done I rebooted once more for good measure.

At this point, you have a git server you can reach on port 22, but no means of accessing your GitLab instance. This is where the dev VM comes in. Since we’re cutting corners on security, we’ll only accessing the GitLab ui and data over http locally in the cloud network. I would not recommend opening port 80 to this server.

So spin up a VM (where you’ll be doing your work). You’ll want  the following software installed:

  • Visual Studio Community Edition
  • Hosts File Editor
  • Git for Windows
  • The GitLab Extension for Visual Studio (Optional if you want to experiment, but I don’t recommend it)

On your Dev computer, use Host File Editor to give an alias to the Git machine using the domain name you specified in gitlab.rb:

gitserver.eastus.cloudapp.azure.com maps to 10.0.0.8

Open a browser and navigate to: http://gitserver.eastus.cloudapp.azure.com

GitLab First Screen
GitLab First Screen

And you’ll get a GitLab page! So use your password manager to generate a secure password, and enter it and you’re up and running!

Now you’re ready to rock. Log in with username ‘root’ and the password you created, and click the  wrench in the toolbar to open the admin area. Click Users in the left menu, then click the green new user button and create your user account (you probably don’t want to be using the root user).

Now, create your new user. Since we didn’t set up smtp mail, you’ll want to set a first password. Then, log in as that user and change the password (again using a password manager to generate a strong password). Now you’re ready to check in code!
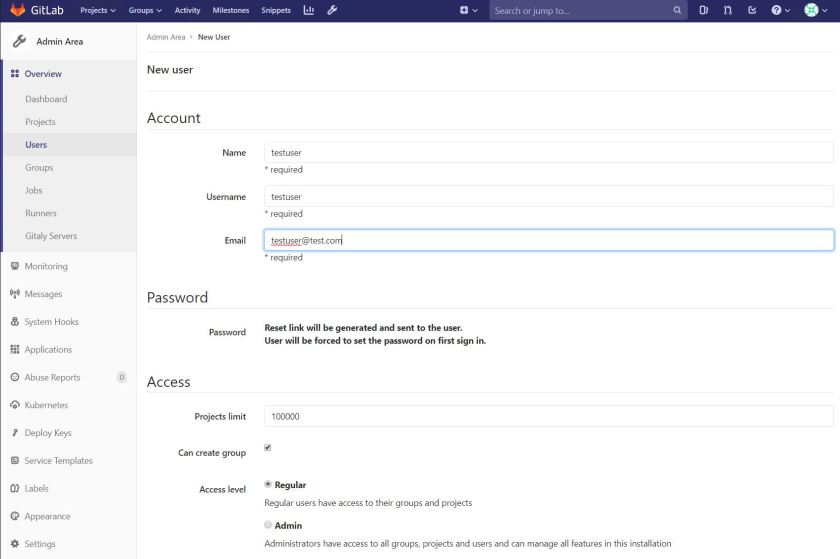
Create a user in GitLab

Checking in some code (the first, bad way)

Open visual studio and create a project, any project.

Just a basic Console Project

Right-click the solution and click ‘Add Solution to Source Control’:

Add solution to source control

This will create your local Git Repository. You will see that it worked in the Output pane under: Source Control -Git:

Source Control Panel

Now you can experiment with changes and local commits. Once you are happy with the commits, it’s time to push this to your GitLab server.

In order to sync with GitLab, the first thing I tried was the GitLab Extension.

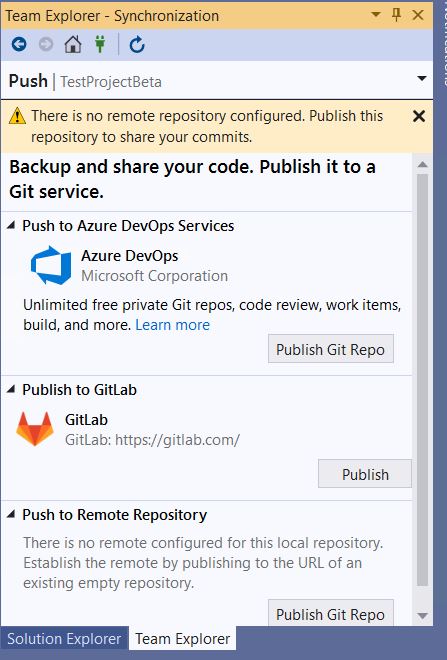
The problem is that the ‘Sync’ pane has a ‘Publish to GitLab’ area that made me think that it could only publish to https://gitlab.com/:

The Misleading GitLab Publish Prompt

The first time you try to commit and sync:

Commit and Sync
Commit and Sync

It will get upset and show this:

A Very Unintuitive Message

So click ‘publish’.

Publish To GitLab
Publish To GitLab

The first time you do it it will prompt for a server and credentials, then it will push to GitLab and set up the project:
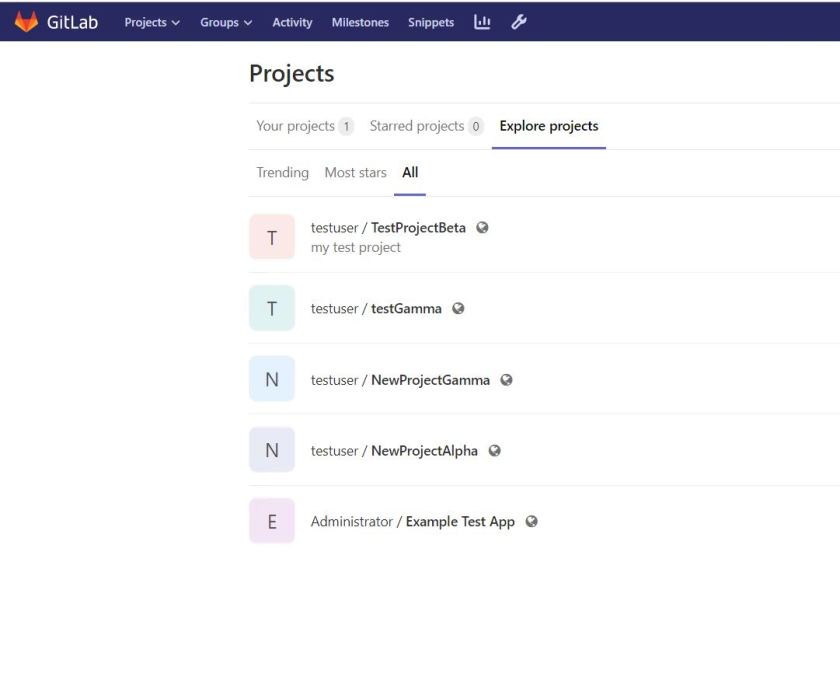
Project is Now In GitLab

As you can see, this worked. However, I can’t for the life of me figure out how to change the server or password, but it’s a start.

It turns out that this extension is sort of dubious, so I went back to this and tried to figure out a better, more sensible way to do this.

Using Git Native Mode With GitLab

So here is what works better. GitLab can also access its repository over http but appending ‘.git’ to the url of your project. To use this approach, create your solution and add to source control, as above.

Using your Test User, Create a project with the same name as your Solution (or another, it doesn’t really matter).

GitLab Project Creation

Copy the Project URL to the clipboard:

http://bghgitexample.eastus.cloudapp.azure.com/testuser/testprojecteta2

In VS, go to the Team Explorer, Click ‘Home’ (the house) and choose Settings, then ‘Repository Settings’. Then, in the ‘Remotes’ section, click ‘Add’.

In the Dialog Box that appears, past in the Project URL, and append ‘.git’ to it.

http://bghgitexample.eastus.cloudapp.azure.com/testuser/testprojecteta2.git

Git Remotes
Git Remotes

Now, in the lower pane, switch to the Package Manager Console (we’re using it just for the convenient PowerShell Console) and enter:

git push --set-upstream TestProjectEta master

This will return a weird that only occurs because we’re using the PowerShell in VS (you can run it in the developer powershell to not show it) but it will then connect your local repository to the project repository .

Package Manager Console

Now you can go to Team Explorer -> Home -> Sync and all the Actions are working:

Git Working with GitLab

The method overcomes the weirdness of the GitLab Extension and gives you a bit of the best of both worlds, it seems.

What I’m listening to as I do this: MC Frontalot’s Nerdcore Rising. A classic of the Nerdcore genre, he’s got some great songs on here. I’ll give Weird Al credit for really the first Nerdcore songs (All about the Pentiums), it really came into being in the early aughts with MC Chris, Optimus Rhyme, and Frontalot.

Building a Small Development Environment with Git, GitLab, Jenkins, and MSBuild

Building a Small Development Environment with Git, GitLab, Jenkins, and MSBuild

It’s been a little while since I posted about a tech project – I’ve spent the first half of the year exploring the Dark Souls universe and watching a bunch of Anime. But now I have a project to do and while researching how to do that project, I found that there doesn’t seem to be a resource on the internet for it.

The Project

My wife is starting a non-profit that is going to need a software platform, and I volunteered to help. However, it’s been a long time since I started something from scratch without any infrastructure, and as I searched the internet, as usual, I found lots of parts of a solution, but not an end-to-end guide to getting a workable build environment built. So I’ll share my notes here in case they happen to be useful to anyone.

My Skills and the Core Tech I’ll Use

I have worked the majority of my career in the Microsoft world, and the project will need a database, so I’m going to center this around a MS SQL Server database, with a C# middle layer/BFF using Entity Framework, and Angular as a front end.

The goal is to have a Development, Test, and Production build system that effectively means that no human interaction is needed with the servers.

I’m going to host this in Azure in a mix of VMs, and I’m going to try to balance security with expediency, with a first goal of getting the whole system working, and the second of gradually hardening the solution. The main issue here is that large scale corporate programming does have a lot more resources, so I want a low-cost reliable system that I can store in the cloud but won’t be a huge burden to manage.

The Software

For this task, I’m going the use the following software.

Git: It’s free, ubiquitous, and a platform I need more experience in. I have been in the TFS (now Azure DevOps Server) world for years, and so I need to get my arms around Git.

GitLab: I wanted a UI for Git for a few reasons. Partly due to my unfamiliarity, and partly because if gives a lot of features out of the box. It also has CI/CD and a ton of other features.

Jenkins: I’m not, actually, going to use the CI/CD pipeline from GitLab, though. I’m going to use Jenkins. I know it better, and it’s great software.

Visual Studio Community Edition: Yes, I could use VS Code, but again, I know VS really well, especially its source control integration.

The Architecture

Basic Lab Setup
Basic Lab Setup

I have an MSDN account, so I’ll use my Azure credits there to flesh this out. I’m going to use 4 VMS to start with:

  • Git server: An Ubuntu server running Git and GitLab. It will have 2 vcpus and 8GB ram.
  • Jenkins Server: a Windows 10 VM running Jenkins. It will have 2 vCPUs and 8GB RAM. It’s on windows so I can run MSbuild and MSDeploy. These might work on Linux, but I see no reason to find out right now.
  • Development server: A windows 10 server with Visual Studio and SQL Server Express. I’ll ultimately move the SQL server to a real box, but SQL instances are expensive, and for now I can live with SQL express. It has  4vCPUs and 32GB RAM.
  • IIS Server: I may or may not end up using IIS (maybe I’ll do an asp.net self-hosted app), but for now, IIS is a pretty good solution.

I’m not doing AD or any sort of domain name service, I’ll be just editing hosts files for this and using internal IPs. For this scale, it’s a bit of a pain to set up, but internal DNS isn’t worth the hassle.

Security to start will be pretty weak, but the goal is to get the environment built and working.

Other Software

In addition to the above, here are other bits of software you’ll need:

  • Host File Editor. It’s for editing host files. It’s one of those great pieces of software you didn’t think you needed until you found it.
  • Google Chrome: I may be using windows, but I have no reason to use Edge.

Next Steps

In the next few posts, I’ll go through the construction and configuration of this environment. The rough steps will be:

  1. Install and configure Git, Gitlab, and a dev machine.
  2. Install and configure Jenkins.
  3. Build the software and the deployer jobs.

What I’m listening to as I do this: DragonForce’s new album ‘Extreme Power Metal‘. DragonForce does one thing, and it does it well. It goes fast. Also, they covered ‘My Heart Will Go On’ on this album. This version of that song should have been the first dance at my wedding (not a household consensus, though).


Installing ELK without Docker on Ubuntu 18.04 with LetsEncrypt

In my last post, I set up ELK in a docker container to see if it would meet my needs, but I found that unless I wanted to go very deep with docker, I’d need to do a raw installation of ELK. The main motivation was that I wanted to install an SSL certificate in Kibana using LetsEncrypt from my pfSense box, and building a job that builds docker every 90 days seemed brittle.

One thing I realized was that you do do a lot without installing the ‘L’ in ELK. LogStash and ElasticSearch both provide means to ingest logs. When you install filebeat on your client, you can opt to output to LogStash or to ElasticSearch. I went direct to ElasticSearch for now, though I will likely revisit that later on. Here are two resources that discuss that here and here.

Continue reading “Installing ELK without Docker on Ubuntu 18.04 with LetsEncrypt”

DMZ Is a Four Letter Word

My latest project is to set up a secure Minecraft server for my kids and their friends to play on. As I  mentioned in my previous post, the usual recommendation to set up port forwarding on your router is a pretty bad idea. Normally, what is recommended is to set up a DMZ. I’ll do this in a bit (I had to order some stuff), but I’d like to talk about DMZs a bit, and how they are a terrible and misleading concept.

Continue reading “DMZ Is a Four Letter Word”

The Internet Is More Mad Max Than Wild West Now

Quaint were the days when we viewed the internet as a ‘Wild West’. I’d take a sparsely populated area of frontier towns where you could travel in a stagecoach, with minimal risk of robbery, to what we have today. Remember ‘Tombstone’? That seems like a downright safe and friendly place to spend time compared to today’s internet, where we basically have to live in miniature fortresses and travel to other larger fortresses in armored convoys, all while under constant attack by a robot-augmented army of criminals.

I got to thinking about this because I’d like to set up a Minecraft server for my kids, but with the recent hack of Mariott, where 500 Million accounts were hacked, I’m reminded (again) that it’s just not safe out there. For context, 500 million is about as many Americans who have ever lived. It’s a little shy of 10% of the world population. Once you think about the scale of these breaches, it’s time to rethink what the internet is.

Continue reading “The Internet Is More Mad Max Than Wild West Now”

Next Project – Video Surveillance with Unifi Video

Now that I’m done with my WiFi project, and everyone is surfing happily (it seems), I’m ready for my next project. For years now I’ve had a basic video surveillance setup using old Panasonic Security Cameras (BL-VP104W) and one ultra sketchy Chinese camera. You know, one of those with extra backdoor admin accounts named 888888 that you can’t disable. I bought extras that I can’t sell on eBay at any price.

Seriously, dont buy these.
Seriously, don’t buy these.

So I want to upgrade to a better video solution. Fortunately, Ubiquiti offers a solution that is as cost-effective as its infrastructure.

Continue reading “Next Project – Video Surveillance with Unifi Video”

Keeping The Kids Safe Part 2: MITM Lessons Learned

We lasted about a day with the new content filtering that I put in place before we switched the kids back to the old open WiFi network. We encountered two problems: Missing whitelist entries, and well built apps that depended on not messing with their certificates with a MITM attack.

Amazon Video, for one, will not communicate with its servers if you tamper with its certificates. Given that the sort of inspection I am doing is a Man-In-The-Middle (MITM) Attack, they have a point. I thought I had prevented this problem, but as it happens, I did not understand two things: SSL inspection, and how Squid decides to mess with certificates.

Continue reading “Keeping The Kids Safe Part 2: MITM Lessons Learned”

16 IPv6 subnets with pfSense and Comcast

One part of my project is to set up IPv6 on certain of my VLANs. IPv6 has long been a bit of a mystery to me. While IPv4 is complicated, the addresses can be held in memory, so we’ve all gotten used to memorizing 4 octets. Further, it allows a fairly simple topography in that the subnets are ‘human-sized’. IPv6 is totally different. It has huge numbers and unreadable addresses. I want each of my VLANs to use IPv6 subnets as appropriate, so here is how I did it. It’s not too complex.

Continue reading “16 IPv6 subnets with pfSense and Comcast”

Keeping the Kids Safe from the Internet with Filtering

This part of the project is easily the most complicated I did, and also took me the most time. There is a quote from a book that I read that ‘information wants to be free’  (a little googling tells me it’s been around for a long time, but I read it in a book by Charles Stross), and this certainly proves it. Trying to make it so kids can’t get to the bad parts of the internet is a good example of this, since you need to do a ton of things to make the filtering work. Here is what I did:

The Goal

The goal is to have a transparent proxy for http and https that keeps my kids away from bad content and redirects them to a friendly error page to tell them that. I wanted to have content screening and filtering, with whitelists to add in what I want them to have access to.

This design is complicated, and it took a while to make me familiar with all the technologies involved. Plus there are some things that I just could not have with my technology.

Continue reading “Keeping the Kids Safe from the Internet with Filtering”

Logging into my Wifi With RADIUS

I have been using my UniFi system for a few months and I’m very pleased. The WiFi is very fast, I can roam around the house seamlessly, and the handoffs are seamless. Now I want to move to the two final stages: advanced access control and then content control for the kids. For access control, I’m going to use RADIUS, specifically pfsense’s freeRADIUS package. I’ve read that this it is a bit arcane, but my experimentation has shown that it’s actually pretty straightforward.

Continue reading “Logging into my Wifi With RADIUS”